MQTT Source
The Tributech Agent supports the integration of external data sources using the MQTT messaging protocol with the Tributech MQTT Source. The MQTT Source itself is configured via the Twin Configuration and will be described in the following sections.
Setup
The Tributech MQTT Source image can be started without any dependencies but will not be functional without a valid Twin Configuration or MessageBroker connect to the Tributech Agent. The TwinConfiguration can be provided via the Tributech Node (recommended) or MessageBroker (see Source Integration). The MQTT Source will automatically connect to the Tributech Agent if the Tributech Agent is running and the MQTT Source is configured with the correct MessageBroker settings.
In the following part we will describe the setup of a Tributech MQTT Source.
- Setup the docker-compose.yml file by creating a
docker-compose.ymlfile with the following content (adjustments required):
version: "3.6"

services:
  source-mqtt:
    image: ${DOCKER_REGISTRY-tributech.azurecr.io/}tributech-source-mqtt:${SOURCE_TAG:-latest}
    depends_on:
      - mosquitto-server
      - tributech-agent
    environment:
      - MqttOptions__MQTTHost=mosquitto-server
      - Logging__LogLevel__Default=Debug
    networks:
      - mqtt-net
    restart: unless-stopped
    logging:
      driver: "json-file"
      options:
        max-size: "2m"
        max-file: "5"

  tributech-agent:
    image: ${DOCKER_REGISTRY-tributech.azurecr.io/}tributech-agent:${AGENT_TAG:-latest}
    depends_on:
      - mosquitto-server
    environment:
      - Logging__LogLevel__Default=Debug
      - Logging__Console__FormatterName=simple
      - MqttOptions__MQTTHost=mosquitto-server
      - EdgeDeviceOptions__AgentID=${AGENT_ID:?"The Tributech Agent requires a GUID"}
      - EdgeDeviceOptions__NodeUrl=${NODE_URL:?"The Tributech Node Url is required"}
      - EnrollmentOptions__EnrollmentCertBase64=${ENROLLMENT_CERT_BASE64:?"The base64 encoded Enrollment Cert is required"}
      - EnrollmentOptions__EnrollmentKeyBase64=${ENROLLMENT_KEY_BASE64:?"The base64 encoded Enrollment Key is required"}
    networks:
      - mqtt-net
    ports:
      - "5000:8080" # enable access to agent mqtt-API (e.g. for configuration with Agent-Companion)
    volumes:
      - ./volumes/mqtt/agent/:/app/data # volume mapping for permanent storage of keys and datatwin file
    restart: unless-stopped
    logging:
      driver: "json-file"
      options:
        max-size: "2m"
        max-file: "5"

  mosquitto-server:
    image: eclipse-mosquitto:${MQTT_TAG:-1.6}
    networks:
      - mqtt-net
    ports:
     - '1883:1883' # MQTT
    # - "127.0.0.1:9001:9001" # web-socket
    restart: unless-stopped


networks:
  mqtt-net:
Adjust the setting for the Tribtech Agent to your environment, sample value:
tributech-agent:
    ...
    environment:
      ...
      - EdgeDeviceOptions__AgentID=00000000-0000-0000-0000-000000000007
      - EdgeDeviceOptions__NodeUrl=https://my-environment.tributech-node.com
      - EnrollmentOptions__EnrollmentCertBase64=LS0tLS1C...ZDdqb29rcUV
      - EnrollmentOptions__EnrollmentKeyBase64=AKS0tLS1C...ZDdqb29rcDE
Configuration
After setting up the Tributech MQTT Source we need to activate it in the Tributech Node (see Agent Management) and configure the TwinConfiguration.

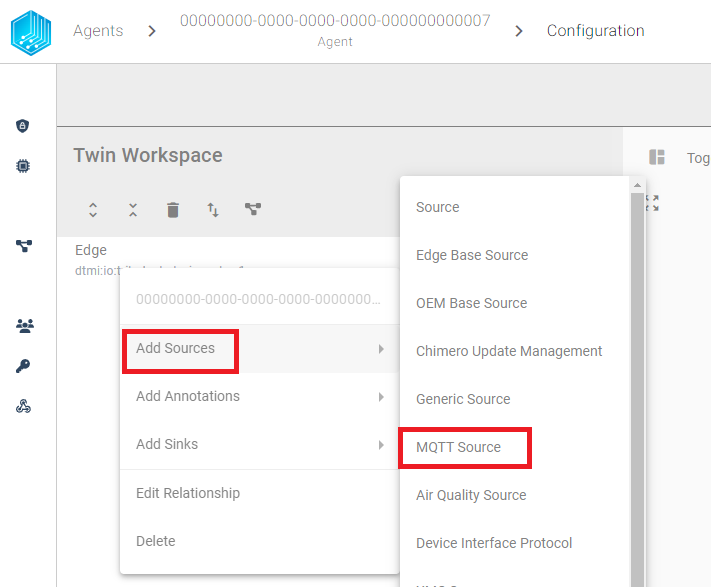
We can now add by right clicking the Device Edge entry a new MQTT Source.
After right clicking on the MQTT Source entry we can add a new MQTT Stream.
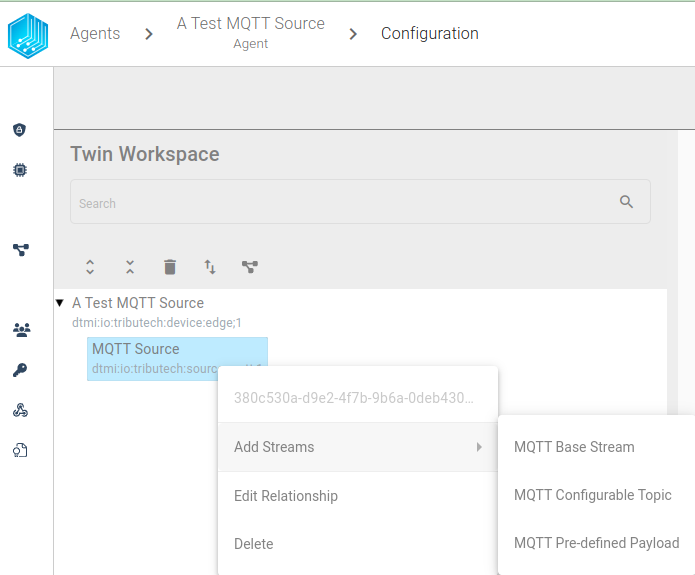
We have two possible choice
- MQTT Configurable Topic Stream: A stream with a custom topic that supports wildcards for the MQTT Topic, e.g.
test/#ortest/+/TEMP - MQTT Pre-defined Payload: A stream with a predefined payload keypair that will be used as an identifier and be sent to a common MQTT Topic
Configurable Topic Stream
In this section we configure a Stream that is linked to a freely customizable MQTT Topic. The following example shows how to setup a stream for a double value with the display name MQTT Stream and the MQTT Topic xxo. For custom topics, two wildcards are supported:
-
A
#character represents a complete sub-tree of the hierarchy and thus must be the last character in a subscription topic string, such astest/#. This will match any topic starting withtest/, such astest/1/TEMPandtest/2/HUMIDITY. -
A
+character represents a single level of the hierarchy and is used between delimiters. For example,test/+/TEMPwill matchtest/1/TEMPandtest/2/TEMP.
The following example shows an example for the wildcard #. After changes to the MQTT custom topic we need to
save the settings by clicking on the SAVE IN WORKSPACE button in the bottom.
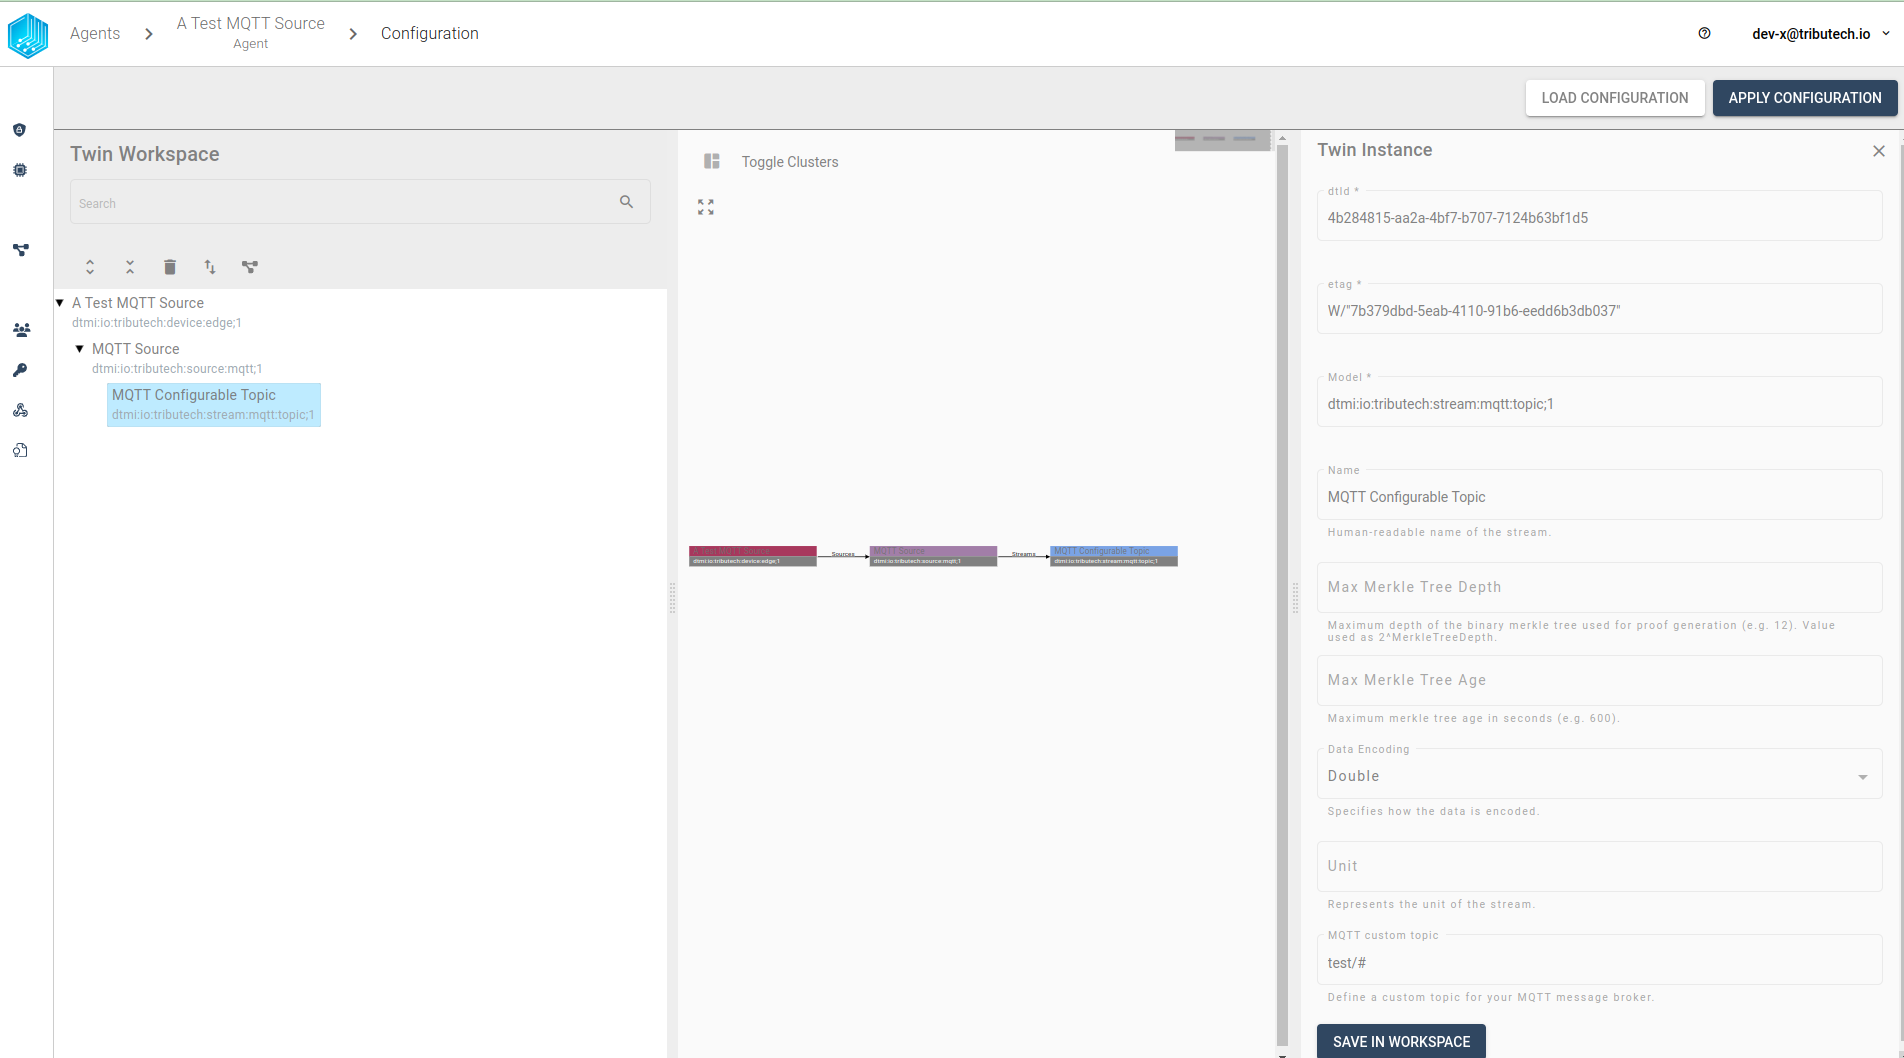
We can repeat this process for all required streams for the MQTT Source. An important note is that the MQTT Source will only work when there are no overlapping topics, i.e. test/# and test/+/TEMP are not allowed to be configured for the same MQTT Source.
After we have configured the MQTT Source we can apply the configuration to the Tributech Agent by clicking on the APPLY CONFIGURATION button in the top right corner.
This completes the configuration of the MQTT Source and we can now send data to the MQTT Source either via an MQTT Client Application like MQTTX, MQTT Explorer or with our Tributech MQTT MockClient. The Tributech MQTT Source MockClient is currently only for testing purposes and works only in combination with our Tributech MQTT Source.
Pre-defined Payload Stream
In this section we configure a Stream that is linked to a predefined payload keypair. The difference to the Topic Stream is that this Stream will not be linked to a custom MQTT Topic but to a common MQTT Topic. The following example shows how to setup a stream for a double value with the keypair my-machine-id and my-sensor-id as stream identifier. The MQTT Topic is set per default to edge/+/value/GenericValueSource. For payload streams, two identifier are supported and need to be unique for each stream. The following keypairs are:
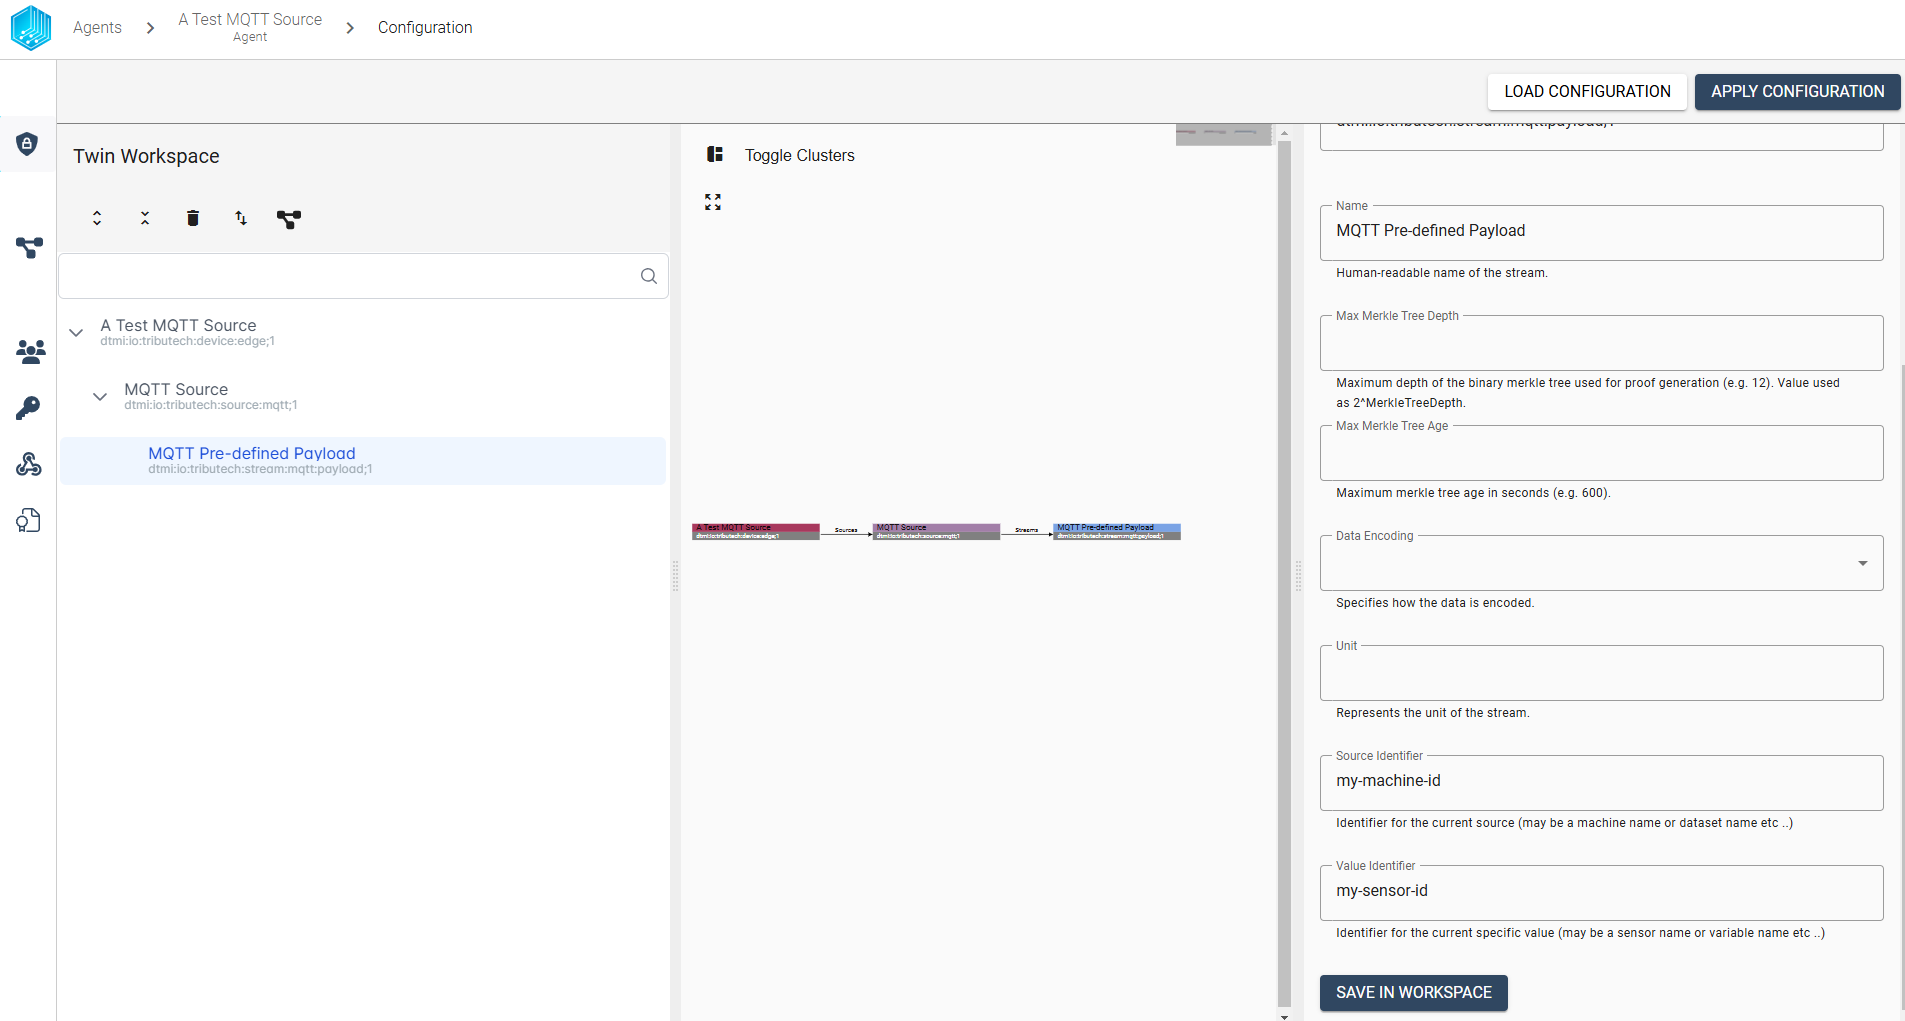
We can now send data to the MQTT Source either via an MQTT Client Application like MQTTX, MQTT Explorer or with our Tributech MQTT MockClient to the common MQTT Topic edge/+/value/GenericValueSource. The Tributech MQTT Source MockClient is currently only for testing purposes and works only in combination with our Tributech MQTT Source.
Value Change Options
The basic handling of Value Change Options (VCO) can be found in Source Integration. This section contains the concrete handling of the Step (Delta) for the simulated source. The following list contains the description for each supported Stream Data Encoding where X represents the value for Step (Delta):
- Double, Int32, Long, Float: defines the minimum difference between values to be submitted, the change is always compared to the last successful submitted value, e.g. if X= 3 if the double values 1, 2, 5, 8, 10, 11, 14 are received by the Tributech Source only 1, 5, 8, 11, 14 will be submitted.
- Byte Array: will only be submitted if the current and last submitted value are not equal
- String UTF 8: will only be submitted if the current and last submitted value are not equal
- Boolean: will only be submitted if the current and last submitted value are not equal
Configurable MessageBroker (Optional)
In this section we show how an additional MessageBroker can be configured to collect data from a different MessageBroker than the one defined in the docker-compose.yml (i.e. source-mqtt). This configuration is optional and does not replace the initial source-mqtt connection. Its only needed if the MQTT Source should be configured to use a different MessageBroker for data collection. Configuration updates and publishing values to the Tributech Node will still be done via the source-mqtt service.
The following example shows how to setup the MessageBroker for the MQTT Source with a different host and port:
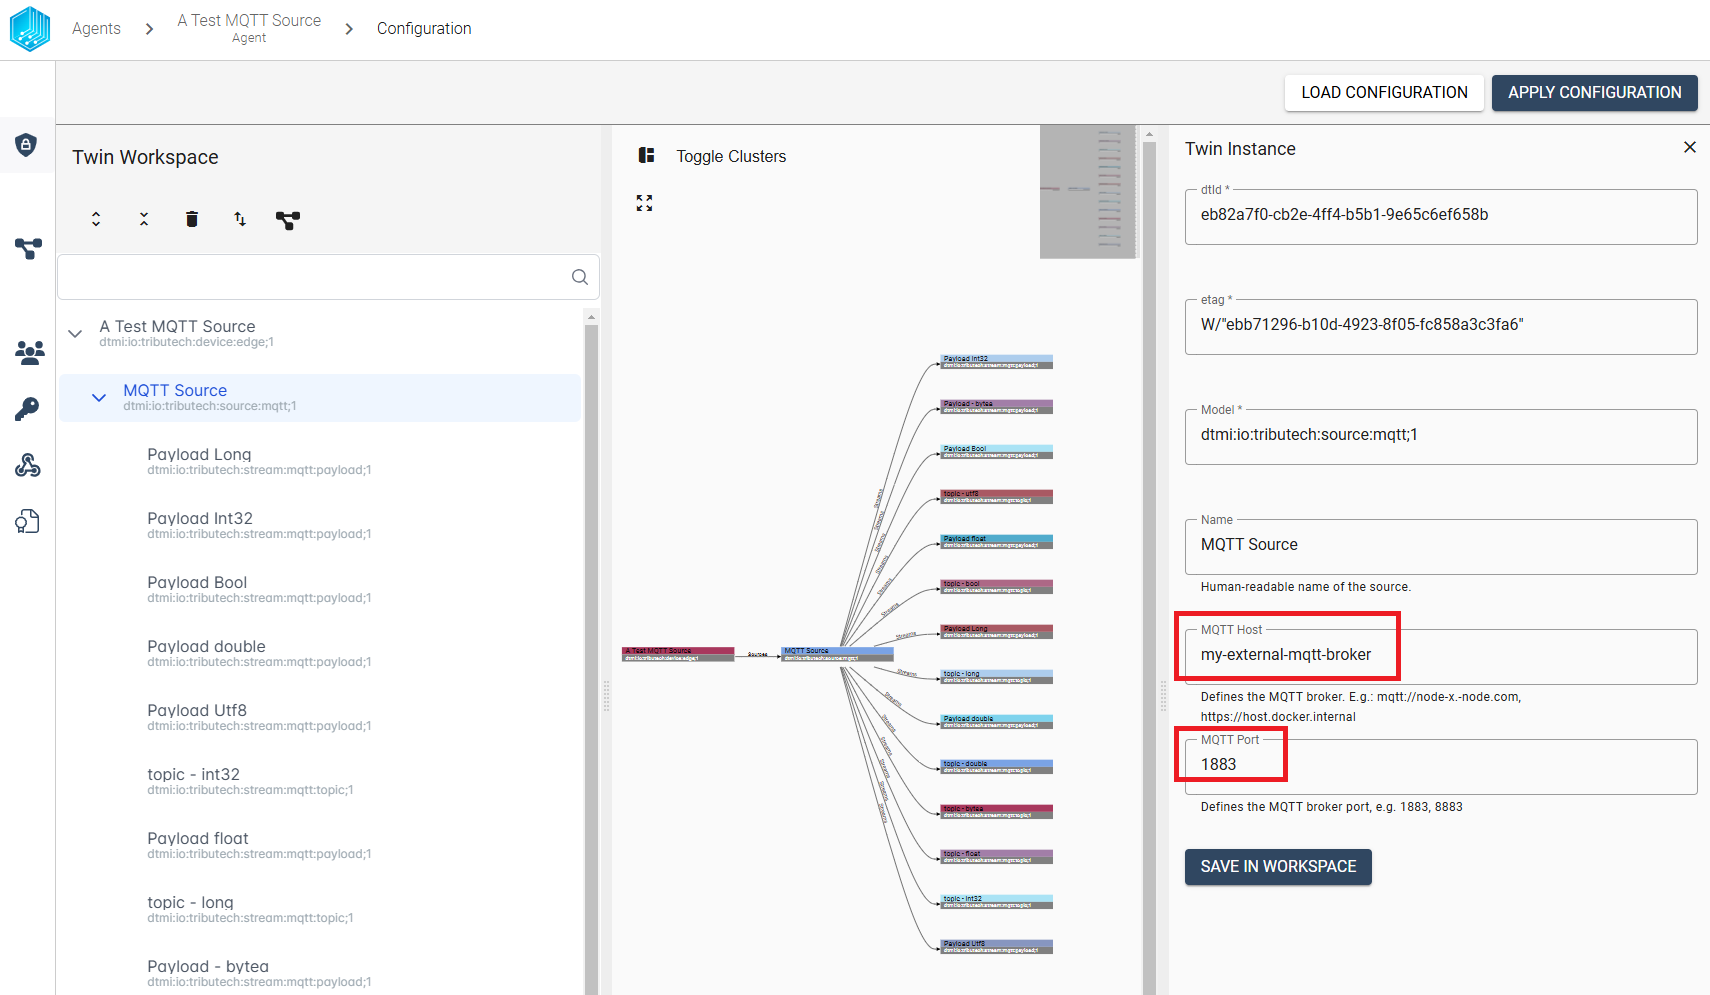
We can save the settings by clicking on the SAVE IN WORKSPACE button in the bottom and apply the changes by clicking APPLY CONFIGURATION.
If the MQTT Source is not able to connect to the MessageBroker the MQTT Source will not be able to receive any data.
However, the MQTT Source will fallback to the default MessageBroker settings (aka the MessageBroker from the docker-compose.yml) if the MQTT Host is empty or the MQTT Port is set to 0.
Providing Data
In the following section we want to outline two different ways to provide data to the MQTT Source. The first way is to use the MQTT Explorer to send data to the MQTT Source. The second way is to use the MQTT MockClient to send data to the MQTT Source. In our example we can access the MQTT MessageBroker on port 1883 (need to match your mosquitto-server-mqtt service in the docker-compose.yml).
MQTT Explorer
The MQTT Explorer supports the interact and monitoring of a MQTT MessageBroker via a simple UI.
We can use the MQTT Explorer to connect to the mosquitto-server-mqtt service in the docker-compose.yml
on port 1883 and manually submit data to MQTT Source via the MessageBroker.
The MQTT Source will send received data after process via the Tribtech Agent to the Tributech Node.
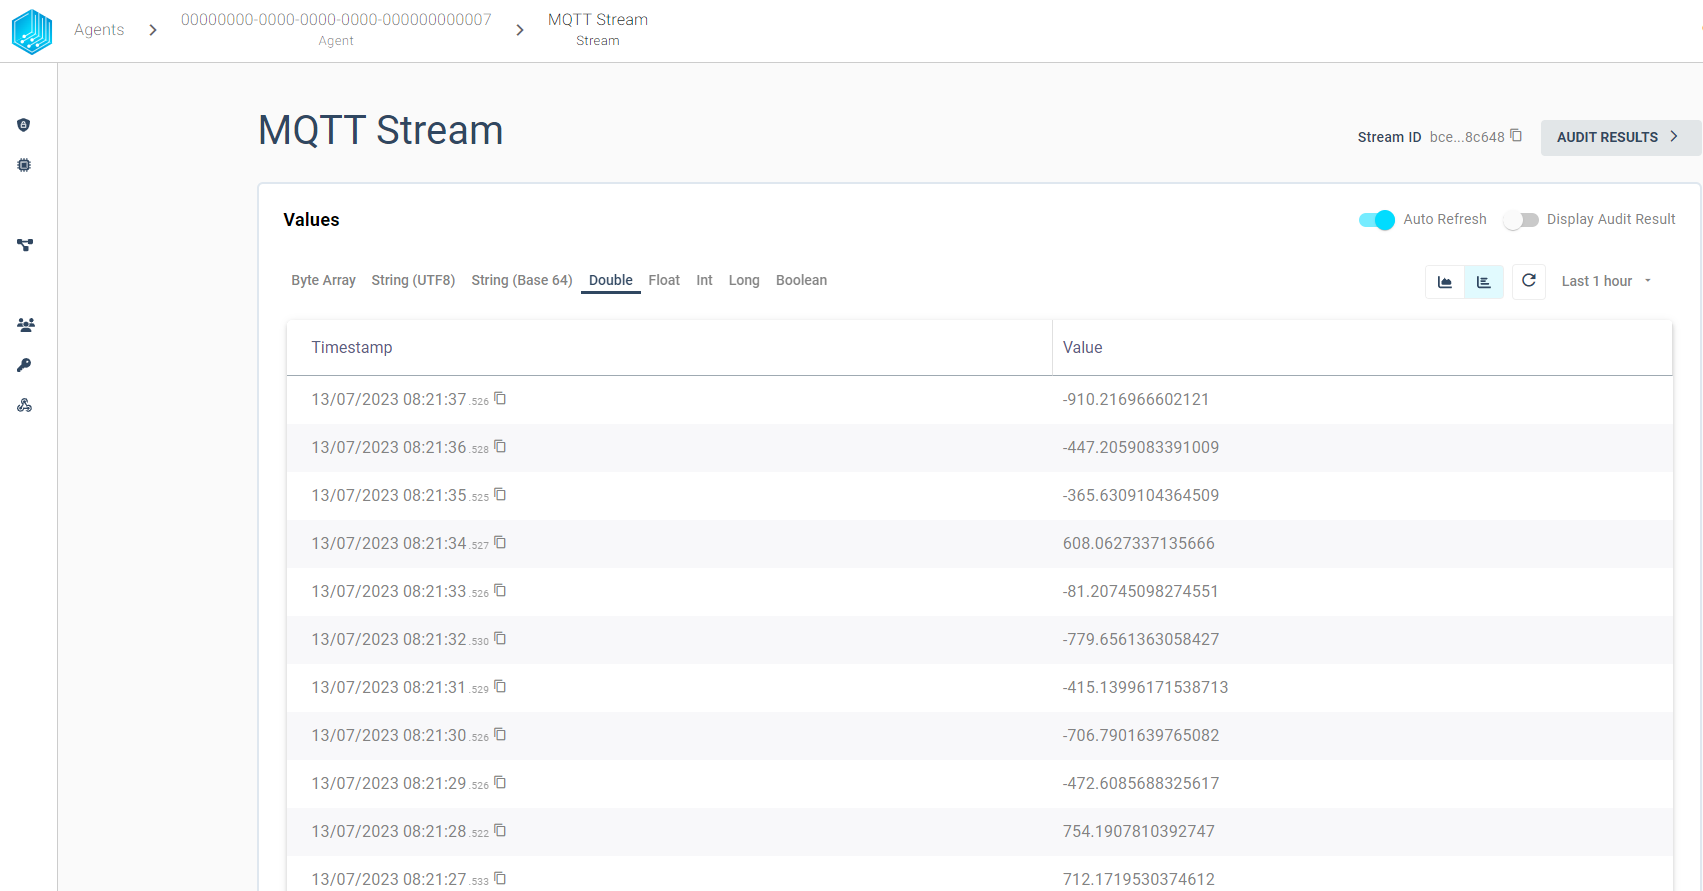
The data of the previously defined Streams can be viewed in the Tributech Node by clicking on the corresponding MQTT Stream.
Per default we will show the data directly in the Stream Data Encoding defined datatype tab.

Sending Configurable Topic Stream Example
The example will submit the following payload data to the MQTT Source previously configured in Setup :
    {
        "Timestamp":"2023-07-13T05:50:07.1003104+00:00",
        "Value":432
    }
Note that double or float values support only a . as a decimal separator
The timestamp can also be changed to fit all specific time zones, this can be done with the last part in the timestamp, here the time difference can be added, for example: «Timestamp»:«2023-07-13T05:50:07.1003104+02:00». It is important that the timestamp also contains microseconds. These can be zeros, but the microseconds are crucial for the timestamp to be processed by the system.
We can post the data to the MQTT Source by clicking on the Publish button in the top right corner.

Sending Pre-defined Payload Stream Example
The example will submit the following payload data to the MQTT Source previously configured in Setup :
    {
        "MachineID": "my-machine-id",
        "SensorID": "my-sensor-id",
        "Timestamp":"2023-07-13T05:50:07.1003104+00:00",
        "Value": 147
    }

MockClient
We provide an additional docker-compose.override.yml below to include a MockClient. This setup can be used to send data to the MQTT Source without external tools. The MockClient is only for testing purposes and should not be used in production. In order to start the the MockClient with the Tributech MQTT Source copy the docker-compose.override.yml file in the same folder as the docker-compose.yml before using the docker-compose up command.
The following configuration shows how to setup the MockClient and send data to the MQTT Source for double stream. This example can be extended by adding new entries with an increasing index for the MockOptions__Streams__{index}__StreamEncoding environment variables. The following example shows how to add a Configurable Topic and Pre-defined Payload Stream the a MockClient:
version: "3.6"

services:
  source-mqtt-mock-client:
    image: ${DOCKER_REGISTRY-tributech.azurecr.io/}tributech-source-mqtt-mockclient:${SOURCE_TAG:-latest}
    depends_on:
      - mosquitto-server
      - tributech-agent
      - source-mqtt
    environment:
      - MqttOptions__MQTTHost=mosquitto-server
      - Logging__LogLevel__Default=Debug

      # Configurable Topic Stream
      - MockOptions__Streams__0__Topic=test/bar
      - MockOptions__Streams__0__StreamEncoding=3 # double
      - MockOptions__Streams__0__Interval=00:00:05.000

      # Predfined Payload Stream
      - MockOptions__Streams__1__MachineId=my-machine-id
      - MockOptions__Streams__1__SensorId=my-sensor-id
      - MockOptions__Streams__1__StreamEncoding=3 # double
      - MockOptions__Streams__1__Interval=00:00:05.000

    networks:
      - mqtt-net
    restart: unless-stopped
After starting the MockClient we can see the data in the Tributech Node Stream we set up before in the configure section.
Modify docker-compose.override.yml
We can adjust the data generation to our needs by modifying the docker-compose.override.yml file, see Docker for details on how to setup the environment for docker-compose.
Dependent on which type of stream we want to send we can adjust the following environment variables either we need to set the MockOptions__Streams__{index}__Topic for the Configurable Topic Stream or MockOptions__Streams__{index}__MachineID and MockOptions__Streams__{index}__SensorID for the Pre-defined Payload Stream. The following example shows how to add a second stream to the MockClient:
    ...
    environment:
      ...
      # Stream 1
      - MockOptions__Streams__0__Topic=xxo/foo
      - MockOptions__Streams__0__StreamEncoding=DOUBLE

      # Stream 2
      - MockOptions__Streams__1__Topic=edge/00000000-0000-0000-0000-000000000007/value/GenericValueSource
      - MockOptions__Streams__1__MachineID=my-machine-id
      - MockOptions__Streams__1__SensorID=my-sensor-id
      - MockOptions__Streams__1__StreamEncoding=DOUBLE
      ...
In Order to add more streams the environment MockOptions setting can be adjusted based on the AppSettings.json configuration capabilities, see Microsoft for details on how to setup the environment variables.
We have some common settings for both streams that need to be set in the environment variables to change the stream generation behaviour:
-
StreamEncoding: Sets the datatype which will be generated based on a numeric value (see Built-in Types for details):
Value .Net type Description BYTEARRAY System.Byte[] Array of 8-bit unsigned integer FLOAT System.Single Single-precision floating-point number DOUBLE System.Double Double-precision floating-point number INT32 System.Int32 32-bit signed integer INT64 System.Int64 64-bit signed integer STRING_UTF8 System.String UTF-8 encoded string STRING_BASE64 System.String UTF-8 encoded string which will be converted to a Base64 encoded string BOOL System.Boolean Boolean value -
Interval: The interval (default 10sec) in which the values are generated in TimeSpan format, e.g. 00:00:05 for 5 seconds, see Microsoft for details on TimeSpan format. The interval cannot be shorter than 1 second.